Tutorial: How to Achieve DVD to MPEG Conversion? Convert DVD to MPEG - Mp4 Converter
Many friends were asking, how to achieve DVD to MPEG conversion, well, this process is not very hard but it does require a combination of various programs to achieve the desired end: a single high resolution Quicktime movie playable on everything since low end G3s. Until Apple releases iDeCSStoMovie™, copying DVDs will not be a simple, one click process. In short, this is for Zen pirates only; ass ninjas, if you will.
Test Setup:
Dual G4 500, 896 MB RAM, Jagwire 10.2.1. The TV was off and I was not wearing a hat.
Apps you'll need:
Apple DVD Player.app.
OSEx - DVD to decrypted .vob Converter. This tutorial was written using version 1.01b which is the current revision.
MM2D - decrypted .vob to Quicktime video converter.
a52decX - decrypted .vob to .aiff converter.
The author of a52decX also makes a great app that converts .vob files to Quicktime video called mpeg2decX that supports subtitles (screenshot). It's a little more finicky to use since it doesn't have a scrub, forcing you to watch a bit of the movie until you get to a frame with a distinct border and/or subtitle. This may actually be needed since it supports subtitles and I don't think they would be properly displayed with a scrub but what do I know. Still, having an app that overlays the subtitles for you is really sweet. It also shows a feedback graph of the output data rate and keyframes for those that like to see more information. Its major disadvantage is that it's slow. I never managed to get more than 4 fps at full size with frame blurring off. It doesn't sap both processors on my duallie so that means the decoder, filters and encoder are all using the same cpu. I've emailed the author in regards to dual cpu support but either my Japanese is ass and I've offended him or he's a busy guy because I haven't received an answer. It's open source, so I encourage anyone versed in Altivec or SMP to help this great little app get a boost. I'd much prefer to use it all the time since it has produced the most bullet proof results and I watch a lot of foreign films. Anyway, If you are wanting to back up a subtitled film and you have almost a full day of cpu time to spare, this is the only way to go.
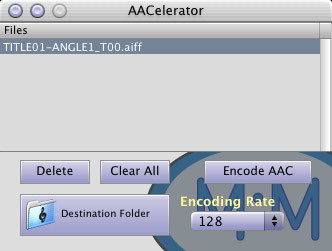
AACelerator
This is basically an Applescript Studio app that takes the outputted .aiff file and sends it to QT for export as AAC audio. You could do it yourself from QT but this is a nice way to avoid various dialogs for your settings.
Quicktime Pro
Maybe there is another free way to do this but my method uses Quicktime.app to add the audio to the video so there is no recompressing.
Optional Tools:
mm2c - Another mpeg2 transcodimifier. seems to do more in less cycles but it's crashed on me so many times, I can't recommend it.
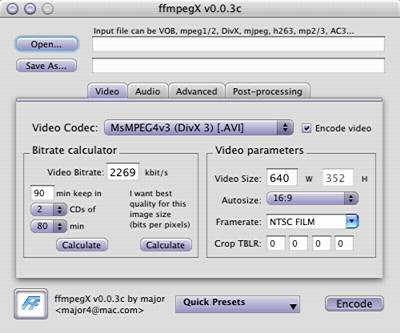
ffmpegX - A nice little app that generates more PC centric formats (MSMPEG4v3 avi, divx 5, etc). It's not polished or reliable enough in its current state to recommend it for anything other than tinkering.
Videolan - A no-frills open source video player for divx, .vob, mpeg2, SVCD, etc. Great for scrubbing through your decrypted .vob files to see if you extracted just what you need.
VCD tools - A word processor. :P
So you have your DVD (one you own, of course) in the machine. Fire up the Apple DVD player and turn on the Show Info in the Window menu and check to see which titles and chapters you can do without. Just remember: deleting artist credits makes baby Jesus cry.
Launch OSEx and pick your title and chapters that you want to convert:
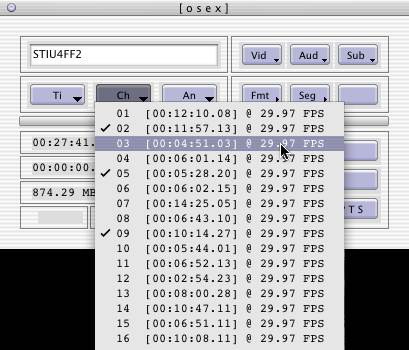
This version finally concatenates the specified chapters in one .vob file without bad MPEG 2 frames puking Mexican relish onto your screen, so many of the hassles of the previous DVD convert how-to have been rectified by this release.
A typical DVD takes about 10-15 minutes to decrypt using one cpu of my dual G4 500.
So now you have your decrypted and potentially illegal .vob file, but you live on the edge so you continue on.
Note that you can use the .vob file for the video conversion and the audio so once you have the .vob file on your machine, you can put your Matrix DVD back in the cooled titanium, black leather and slow motion chamber from whence it came. If you've just decrypted The One, the garbage will suffice.
Converting the .vob file to Quicktime video
Open MacMPEG2Decoder (MM2D). Drag your .vob file into the well at the bottom. Note that all these apps used support batches so set up a queue if you like.
Set up your preferences for the app before you do anything else.
Turn on 16-240 -> 0-255 color expansion. It will result in better color and truer blacks. If your footage looks slightly washed out, chances are you have this turned off (an example). Be warned that this will also lengthen encode times slightly.
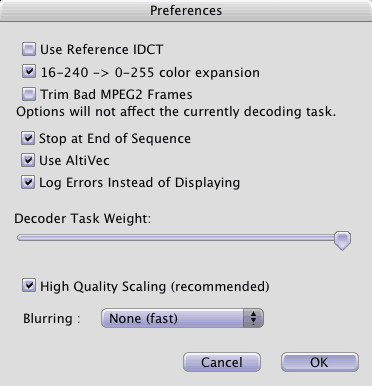
High quality scaling does two things:
-slightly soften output for better compression.
-eliminate any aliasing artifacts that are caused by scaling.
It will increase your encode times by at least 3x which is totally moronic since mm2c seems to be able to do scaling without adding much time but whatever. If you are like me and care more about quality than size, high blurring settings can annoy by being softer than the intention of the brilliant artist you are converting off. The solution is cropping without scaling, not done here for the sake of a full walk through.
Quicktime MPEG 4 Settings:
Now to set your QT settings. We're going to use MPEG 4 since this is the best free option on the Mac. It would be nice if Apple offered the control that many of the Windows encoders offer but I dye grass (Me waits patiently for the horn of unfunny). The HQ option is 1 pass VBR from what I've heard. If you specify a specific maximum bit rate, it will increase encode times. I set one key frame for every three seconds (72 for 24 fps for those that got IT jobs straight out of grade two) but maybe video people can tell me something better to use. For quality, I usually set it at around 60-70 which looks good at about 120-180 kbps depending on your source.
Calculating bit rates for one or two CDs, DVD RAM, etc. is probably the way to go since you can maximize your quality for your output. This is one thing that ffmpegX is good for. You can use it to calculate bit rates for specific output sizes. Just make sure to leave about 100-150 MB for the AAC audio.
Output Destination:
Surprise me.
Transform:
In order to get a frame to look at before you enter the transform settings, enable preview and then scroll through the footage, finding a frame with clear borders. The preview scroll thing is finicky so you may have to scroll forward and then back — don't ask why. Once you get a good frame, click for the transform settings. I find the auto crop Wizard (!) lops too much off so I usually spend a good month typing in manual settings and drawing giant pie charts on the ground. Wizard outfit optional.
Once you have cropped the black bars, set your scaling. You can be generous with the size. Thanks to QT6's low cpu use for MPEG 4, high res MPEG 4 movies won't dog like DivX at high resolutions on older or newer mediocre hardware.
Launch your calculator, or for those engineering students, pull it out of it's kryptonite case or launch Matlab and click the giant button that says "MULTIPLICATION AND DIVISION". According to the old way of encoding, you should specify an output resolution that is a multiple of 16 in both width/height for the encoder. While this isn't necessary anymore with MPEG 4, it can decrease encode times. Just try to stay away from uneven numbers because I've seen QT drop frames trying to scale a movie that had an odd numbered resolution.
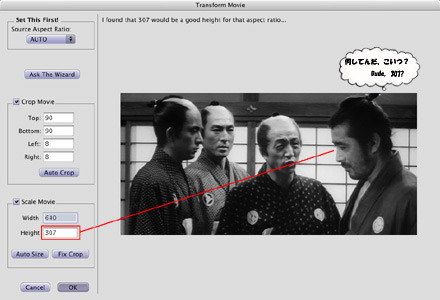
Toshiro Mifune: Blue Steel cool even in the face of bad scaling
Okay those sezzettings. Hit encode and STAND BACK! Then sit down again since this going to take between five to twenty hours, depending on your hardware. Dual cpus and Altivec are a big boon here and, from what I've heard from iBook owners' experience, you'll suffer without them. I'd appreciate any newer dual G4 owners reporting their frame rates in the Ars Forum's Discussion Thread. I typically get 5 fps because MM2D's scaling/blurring algorithm is such a dog. mm2c typically gets 22 fps using less cpu but, as I said, it's lacks stability.
Turn off preview when you don't need to see feedback as it consumes cpu cycles.
Some Tips For the Video
If you want to save yourself some time, use OSEx to decode a single chapter or two which contain different elements (soft gradations of color, tons of action and texture) for a test of what you should set your bit rate at. I encoded Dune and Sanjuro at relatively high bit rates (~170-220 Kbps) for 2 CDs because both films have incredible subtlety of shade which can get easily lost. This is often where the compression is most noticeable and frustrating. Two examples of these trouble areas (scaled ~1.5x): Dune, Sanjuro. Nothing kills the mood of a Lynch film like crusty shadows and red curtains that smack of Win95 boot screen tile-work.
Now for the audio
We just got talkies in Canada and everybody's pretty excited. So imagine my excitement when I saw that I could extract this "audio" from the "DVD" for all kinds of future enjoyment.
The first version of this DVD convert tutorial recommended using mac3dec to decode the audio but I have been getting pops in the audio in Jaguar with it so we'll use a52decX instead. Open the app and drag the .vob into the file well. You don't need to change any settings but if you do, click the appropriate radio buttons before dragging the .vob file in. You'll get an .aiff for output.
Once you get your .aiff, launch AACelerator and drag the aiff file in, set your bit rate (I use the default 96k), hit Encode AAC and then wait some more (consider yourself a Zen master by now). It typically takes about twenty minutes on my machine, using only one cpu according to top.
Now you have two files - an .mp4 audio file and a .mov video file.
Adding the video to the AAC audio:
Open both files in Quicktime (you'll need to have a Quicktime Pro license to do the following steps). To start, go to your .mov video and select all and copy it. Then go to the .mp4 audio, select all and select Add Scaled from the Edit menu. Test your results. You might end up with a movie that's slightly out of sync, what I call the "sophomore lover effect". If this happens, you are left to trim the end and beginning of the video file frame by frame to get the scaled results to line up. Problems can also occur if your source is variable frame rate, which I haven't found a way to predict. If you want to avoid these syncing issues entirely, use mpeg2decX since it maintains the variable frame rate and has never produced a file that needed tweaking. Just remember it's slow, so try and just crop without scaling if you use it.
Once you have a final synced movie, choose Save As, making the movie self contained so that it's not dependent on any of the source files. If you want to split this movie into bite-size CD chunks, now is the time to do it.
Now you have a backup of your film should your original DVD ever die a scratchy death.

Featured Guides
Guides Categories
Video/Audio Guides
- 4Media Audio Converter Pro Tutorial
- 4Media Movie Editor 6 Tutorial
- Video Converter Ultimate Tutorial
- How to convert DAT to other videos
DVD/CD/Blu-Ray Guides
- 4Media Blu Ray Converter for Mac Tutorial
- How to convert Blu-ray disc to video files
- How to burn AVI, MPEG, VOB, DAT, M2V, MPG to DVD on Mac
- How to burn DivX to DVD on Mac
iPod Guides
- 4Media iPod Max Guide
- How to convert AVI, MPEG to iPod MP4 format
- Guide: 4Media iPod to PC Transfer
- How to convert DVD to iPod on Mac
iPhone Guides
- 4Media iPhone Contacts Transfer for Mac Tutorial
- 4Media iPhone Contacts Transfer Tutorial
- 4Media iPhone Ringtone Maker for Mac Tutorial
- 4Media iPhone Max Guide
iPad Guides
Youtube/Online Video Guides
- 4Media Online Video Converter for Mac Guide
- 4Media Online Video Downloader for Mac Guide
- 4Media Online Video Converter Guide
- 4Media Online Video Downloader Guide
PPT/PDF Guides
Others
Articles
- How to download YouTube videos for free
- How to download/convert YouTube videos to iPod
- How to download and convert YouTube videos
- All features of apple iPhone
- Now you can get more TV offerings from Apple iTunes
- Video Streamer HAVA from Snappy Multimedia
- iPod Growth Driving Demand for Flash Memory
- MediaMan HVX-3500 Review
- Uncertain whether new iPod will be delayed or not because of hurdles
- T3's top five iPod alternatives
- Envivio Exhibits MPEG-4 Solutions from Mobile to HD at CCBN2006