4Media Movie Editor 6 Tutorial
As professional movie making software, 4Media Movie Editor 6 lets you easily make movie, import and edit your videos. Almost all videos are supported including camcorder videos (MTS, M2TS), HD videos (HD AVI, HD MPEG-2/4, HD VOB, HD WMV), and common videos (AVI, 3GP, M4V, MPEG, MP4, RM, RMVB, FLV, VOB, MPV, MOV, DAT, ASF, WMV).
In general this article is divided several parts as below.
Part 1: Getting Started
Part 2: Clip Video Segments
Part 3: More Applied Functions
First, download 4Media Movie Editor 6, install and run it.
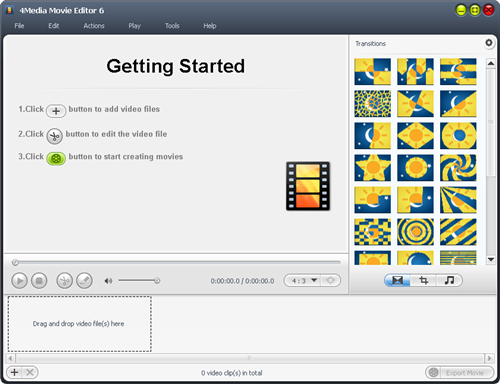
1. Add files
Click the "Import File(s)..." button at the bottom of the main window and choose one or more video files in the dialog that opens. The loaded videos will be displayed in the movie list.
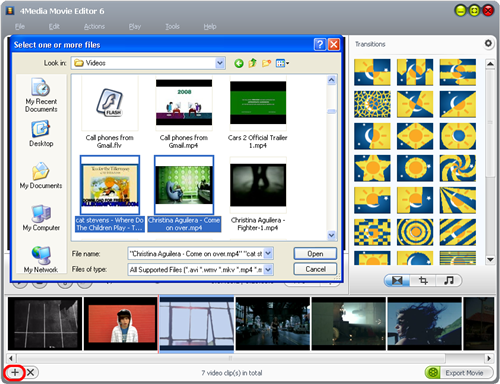
You can also select "File > Import File(s)..." in the main menu to add video files, and click "File > Import Folder..." to choose a folder and add all the files in the folder into the movie list.
Tips:
(1) You can import files by simply dragging them from your local disk to the "Drag and drop video file(s) here" area in the movie list.
(2) Click to select a video file, drag and drop it to left or right to adjust its display position. You can also click "Edit > Move Left" or "Edit > Move Right" in the main menu to adjust its position.
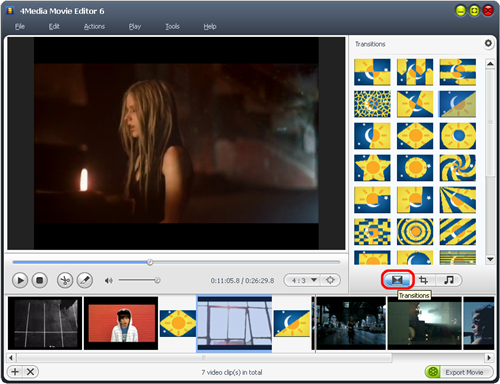
2. Add Transitions
Click "Transitions" button on the right of the window to open the "Setting" page of "Transitions". Select a transition in the list, drag and drop it to the position where the transition is needed.
Tips:
(1) Select one transition, click "Apply to All" in the right click menu to apply the transition between every two video files.
(2) Select a transition from the video list, click "Settings…" from the right click button to set the length and mode of transition.
(3) Click the "Settings" button above the "Transition" list, select "Add random transitions" option in the menu to add random transitions between two video files.
3. Output Settings
Click "Export Movie" button at the bottom of main window to open the "Output Settings" window.
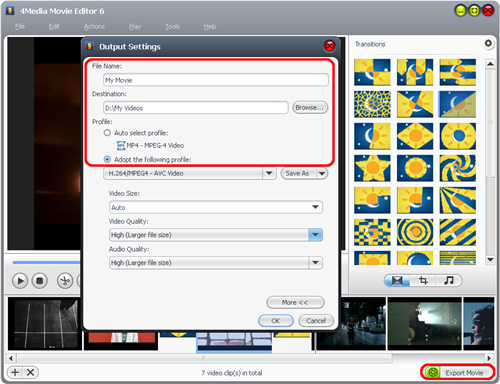
(1) Enter the movie name in the textbox corresponding to the "File Name".
(2) Click "Browse…" and select the output directory in the pop-up dialog.
(3) Set "Profile"
You can select "Auto select profile" option, the program will select the format of the longest video in the list as the default output format. Click drop-down menu in "Adopt the following profile" option and select a profile to change the output format.
4. Output Movies
After the above settings are done, click "OK" button in the "Output Settings" window to output the movie. You can click "Pause" or "Abort" button to pause or cancel the output.
This feature allows you to clip the segments you like from a video.
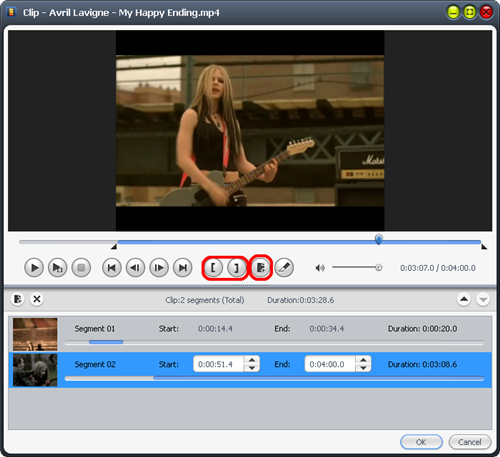
1. Select a video file from the movie list; click the "Clip" button on the toolbar to open the "Clip" window.
2. Click "Play" to play the selected file.
3. During playback, click "Set Start Point" and "Set End Point" at any time to set the start and the end point respectively for the video segment you want to clip.
4. Click "New Clip" and repeat Step 3 to get a new segment.
Tip: You can also drag the slider to adjust the positions of the "Start" and "End" points. Select a segment from the segment list and click "Delete" to delete it. To change the order of a segment in the list, select the segment and click "Move Up" or "Move Down". After the above operations, click "OK" to return to the main window. The video clips you trimmed will be displayed in the file list.
Part 3: More Applied Functions
• Crop video screen size
Click "Crop" button on the right of the window to open "Crop" setting page. You can select from "16:9", "3:2" and "4:3" ratios. Drag the red line and red cross in the preview area to adjust the screen size according to actual need. Values of "Left Margin" and "Top Margin" can be configured too.
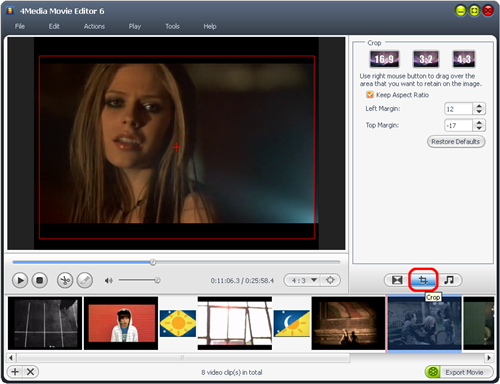
Tip: Check "Keep Aspect Ratio" option, the video size you are adjusting will always keep changing with the selected aspect ratio.
• Add audio track to movie
Click "Audio" button on the right of the window to open "Audio Track" setting page. From there, you can add multiple soundtracks for the movie. You can also add different soundtracks to each of the video files within the movie.
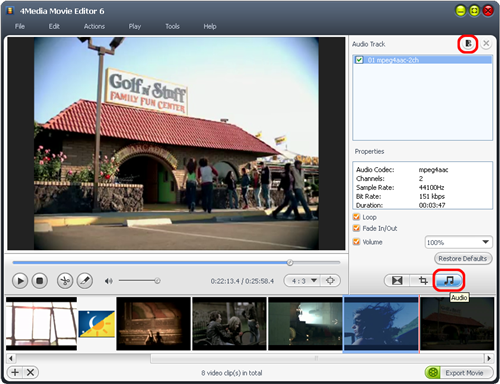
Click on the "+" icon ("Add Audio Track") and select an audio file from your computer. Repeat this process to add multiple soundtracks to the movie. The added soundtracks as well as the soundtracks already contained in the movie are displayed in the soundtrack list.
Tips:
(1) Select an audio file from the soundtrack list to view its properties.
(2) Check an audio file in the soundtrack list and click the "×" icon ("Delete Selected Audio Track") to delete it.

Featured Guides
Guides Categories
Video/Audio Guides
- 4Media Audio Converter Pro Tutorial
- 4Media Movie Editor 6 Tutorial
- Video Converter Ultimate Tutorial
- How to convert DAT to other videos
DVD/CD/Blu-Ray Guides
- 4Media Blu Ray Converter for Mac Tutorial
- How to convert Blu-ray disc to video files
- How to burn AVI, MPEG, VOB, DAT, M2V, MPG to DVD on Mac
- How to burn DivX to DVD on Mac
iPod Guides
- 4Media iPod Max Guide
- How to convert AVI, MPEG to iPod MP4 format
- Guide: 4Media iPod to PC Transfer
- How to convert DVD to iPod on Mac
iPhone Guides
- 4Media iPhone Contacts Transfer for Mac Tutorial
- 4Media iPhone Contacts Transfer Tutorial
- 4Media iPhone Ringtone Maker for Mac Tutorial
- 4Media iPhone Max Guide
iPad Guides
Youtube/Online Video Guides
- 4Media Online Video Converter for Mac Guide
- 4Media Online Video Downloader for Mac Guide
- 4Media Online Video Converter Guide
- 4Media Online Video Downloader Guide
PPT/PDF Guides
Others
Articles
- How to download YouTube videos for free
- How to download/convert YouTube videos to iPod
- How to download and convert YouTube videos
- All features of apple iPhone
- Now you can get more TV offerings from Apple iTunes
- Video Streamer HAVA from Snappy Multimedia
- iPod Growth Driving Demand for Flash Memory
- MediaMan HVX-3500 Review
- Uncertain whether new iPod will be delayed or not because of hurdles
- T3's top five iPod alternatives
- Envivio Exhibits MPEG-4 Solutions from Mobile to HD at CCBN2006