4Media iPhone Max Guide
How to manage iPhone files withou iTunes? This guide is designed to help you transfer files between iPhone and computer, backup iPhone files to iTunes library, copy DVD movies to iPhone directly and transfer incompatible media files from computer to iPhone with 4Media iPhone Max.
To be clear, we divide the guide into 5 parts as below:
- Part 1: Import supported media files to iPhone
- Part 2: Backup iPhone files to your computer
- Part 3: Copy iPhone files to iTunes library directly
- Part 4: Copy DVD movies to iPhone/iTunes directly
- Part 5: Transfer incompatible media files to iPhone/iTunes
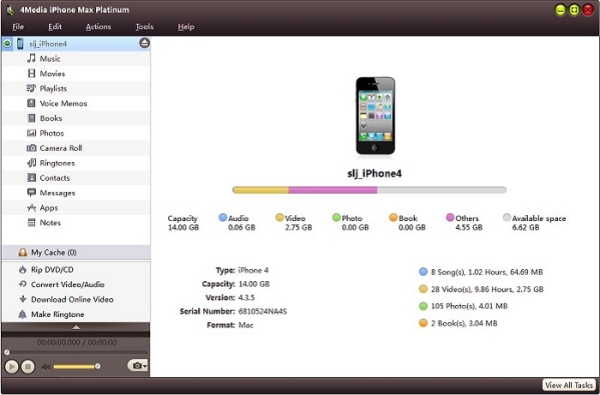
First, download, install and run 4Media iPhone Max, then connect your iPhone to your computer, then the application recognizes it automatically and displays its device information on the first interface.
Part 1: Import supported media files to iPhone
Step 1: Open the library/playlist that you want to import.
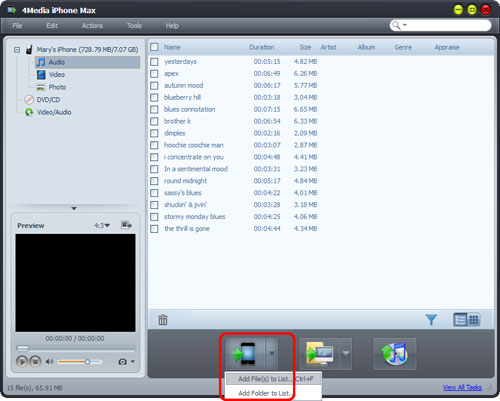
Step 2: Click the "Add File(s) to Device" drop-down button on the bottom, choose the "Add File(s) to List" option, and select the files you want in the dialog that opens then import them to your iPhone, or choose the "Add Folder to List" option to locate the folder you want and import all the files in the folder to the list.
Tips: You can also right click the library/playlist, and choose "Add File(s) to List" or "Add Folder to List" option to import the files you want to add.
Part 2: Backup iPhone files to your computer
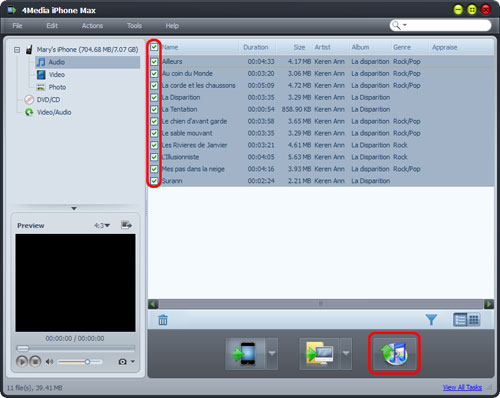
Step 1: Open a library/playlist, and check the files you want to export.
Step 2: Click "Export Checked Files to Local Folder" drop-down button, then choose "Export to Local" option, then select the folder for saving the checked files in the dialog that opens to start exporting.
Tip: You can also right click the checked files, and choose "Export to Local" option to start exporting the files to the folder you want.
Part 3: Copy iPhone files to iTunes library
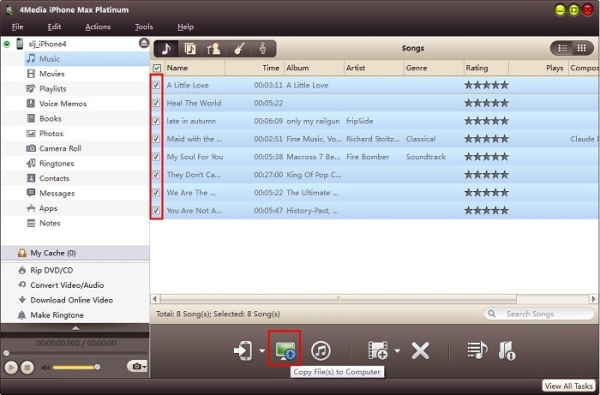
Step 1: Open a library/playlist, and check the files you want to export.
Step 2: Click "Export Checked Files to iTunes" button, then iTunes opens and the program starts exporting the files to iTunes.
Tip: You can also right click the checked files, and choose "Export to iTunes" option to start exporting the files to the folder you want.
Part 4: Copy DVD movies to iPhone/iTunes directly
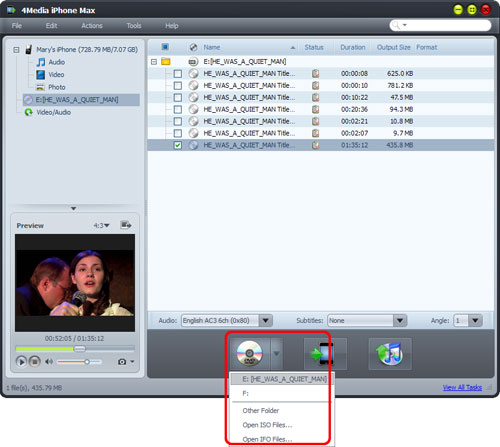
Step 1: Insert a DVD movie disc you want to copy.
Step 2: Choose the DVD/CD node in the left tree, and click "Open DVD" drop-down button on the bottom, then choose the inserted DVD disc from the drop-down lost, or choose a DVD folder, ISO file or IFO file on your local disk, then load them into the list.
Tip: You can also right click the DVD/CD node in the left tree, click "Open DVD" and choose the inserted DVD disc, or click "Open DVD > Other Folder" to choose a DVD folder, or click "Open ISO Files…" or "Open IFO Files…" to load the ISO or IFO files you want to import.
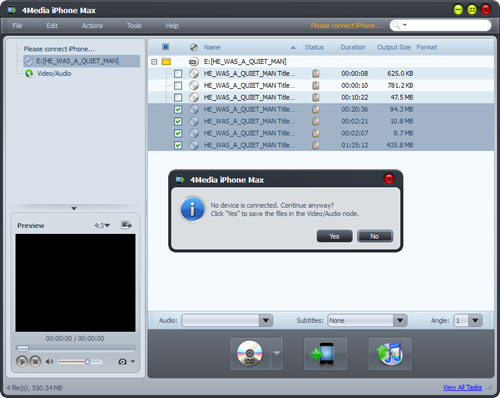
Step 3: Check the files you want to import in the list, and click "Export Checked Files to Device" or "Export Checked Files to iTunes" button to copy them to your iPhone or iTunes library.
Tip: If you didn't connect any device, then after you click the "Export Checked Files to Device" button, the application will prompt you that no device is connected. Click "Yes" to continue converting DVD movie and save the converted media files in the Video/Audio node for later operation, and click "No" to cancel importing DVD movie.
Part 5: Transfer incompatible media files to iPhone/iTunes

Step 1: Click the Video/Audio node in the left tree.
Step 2: Click the "Add File(s) to Device" drop-down button on the bottom, choose the "Add File(s) to List…" option, and select the files you want in the dialog that opens to add them to the list. Or choose the "Add Folder to List…" option to locate the folder you want and import all the files in the folder to the list.
Tip: You can also right click the Video/Audio node, and choose "Add File(s) to List…" or "Add Folder to List…" option to add the files you want.
Step 3: Check the files you want in the list, and click "Export Checked Files to Device" or "Export Checked Files to iTunes" button to copy the files into your iPhone or iTunes library.
Tip: If you didn't connect any device, then the application will prompt you that no device is connected. Click "Yes" to continue converting the files and save the converted media files in the Video/Audio node for later operation, and click "No" to cancel adding the files.

Featured Guides
Guides Categories
Video/Audio Guides
- 4Media Audio Converter Pro Tutorial
- 4Media Movie Editor 6 Tutorial
- Video Converter Ultimate Tutorial
- How to convert DAT to other videos
DVD/CD/Blu-Ray Guides
- 4Media Blu Ray Converter for Mac Tutorial
- How to convert Blu-ray disc to video files
- How to burn AVI, MPEG, VOB, DAT, M2V, MPG to DVD on Mac
- How to burn DivX to DVD on Mac
iPod Guides
- 4Media iPod Max Guide
- How to convert AVI, MPEG to iPod MP4 format
- Guide: 4Media iPod to PC Transfer
- How to convert DVD to iPod on Mac
iPhone Guides
- 4Media iPhone Contacts Transfer for Mac Tutorial
- 4Media iPhone Contacts Transfer Tutorial
- 4Media iPhone Ringtone Maker for Mac Tutorial
- 4Media iPhone Max Guide
iPad Guides
Youtube/Online Video Guides
- 4Media Online Video Converter for Mac Guide
- 4Media Online Video Downloader for Mac Guide
- 4Media Online Video Converter Guide
- 4Media Online Video Downloader Guide
PPT/PDF Guides
Others
Articles
- How to download YouTube videos for free
- How to download/convert YouTube videos to iPod
- How to download and convert YouTube videos
- All features of apple iPhone
- Now you can get more TV offerings from Apple iTunes
- Video Streamer HAVA from Snappy Multimedia
- iPod Growth Driving Demand for Flash Memory
- MediaMan HVX-3500 Review
- Uncertain whether new iPod will be delayed or not because of hurdles
- T3's top five iPod alternatives
- Envivio Exhibits MPEG-4 Solutions from Mobile to HD at CCBN2006