How to: Transfer iPod Music to Computer - Mp4 Converter
Last week we talked various ways by which one can keep iTunes and the iPod in sync (or not, if you preferred). This week, we build on this theme of file transfer as we explore how to conduct the transfer of music in the opposite direction: from the iPod to your PC or Mac.
This tutorial has been, by far, the most anticipated and most requested in our entire iPod 101/201 series. Many, many users have thought that while Apple has reached near perfection when it comes to ease-of-use when loading the iPod and organizing music, there is an overt omission of the ability to easily transfer music from an iPod to a computer.
There is little doubt that this is due to contractual obligations between Apple and the content creators & distributors that they partner with for the iTunes Music Store. It is most probably that there exists a clause in Apple's iTMS contract that disallows Apple from facilitating iPod to PC file transfers for fear of multi-gigabyte "mass piracy" between friends.
However, it is not difficult to imagine legitimate, legal uses of an ability to transfer audio from the iPod to a computer. Here are a few:
- Desktop hard drive failure: Reload your library instantly from your iPod.
- Buying a new computer: Use the iPod as an easy way to get your iTunes library transferred.
- Distributing iTunes Music Store files to your 5 legally authorized computers.
- Keeping similar libraries at work and home
These are only a few of many legal iPod to PC converters. Because of this reason, many third-party developers have stepped in to fill in Apple's deficiency in this area. Software packages are available as both Freeware and Shareware ($5 and up) for both Macintosh and PC users.
PC:
- PodPlus: The $15 successor to a very popular freeware option with many options in addition to the music copying feature.
Mac:
- Senuti: A Free option with an iTunes-like interface, search function and iTunes playlist regeneration.
- iPodRip: A $10 Shareware option with a nice interface and iTunes playlist regeneration.
- iPod.iTunes 3.0: A $35 Shareware option with the ability to transfer both music and videos from iPod to Mac with a single button press. (Added Jan. 2, 2006.)
Both:
- PodUtil: A £10 Shareware program which offers powerful copy features and iTunes playlist regeneration.
Attention that this is by no means a comprehensive list… We urge all readers to peruse the diverse options to find an interface/functionality/price combination that suits you best.
How does we proceed with a detailed tutorial on a procedure which requires third-party software, for an audience that includes many readers who use both Mac and Windows-based environments? Quite simply, we have chosen to write the following tutorial using PodUtil, as its interface and feature set are identical on both platforms. PodUtil is a very nice, very capable piece of software that most users will be pleased with. Note that whichever software you decide to use, the interface and procedure will likely be quite similar to the following:
Getting Started
To begin, download and install PodUtil from this website.
Next, connect your iPod using USB2.0 or Firewire to the computer you'd like to upload to.
Note:
PC: If iTunes isn't installed yet, your iPod will show up as a portable hard drive automatically. It's Ok. If iTunes is already installed on the souce computer, it will likely open and ask if you'd like to associate this iPod with this computer, deleting its content. CLICK NO!! In many cases, you're doing this because the iPod is your only copy of your library… you don't wan't to delete it!! Ensure that "Enable Disk Use" is selected as we did in last week's article.
Mac: iTunes will open and ask if you'd like to associate this iPod with this computer, deleting its content. CLICK NO!! In many cases, you're doing this because the iPod is your only copy of your library… you don't wan't to delete it!! Ensure that "Enable Disk Use" is selected as we did in last week's article.
Next, launch PodUtil. PodUtil will detect your iPod, parse through its database, and display a list of all of your tracks in the main window, with a listing of your playlists on the left:
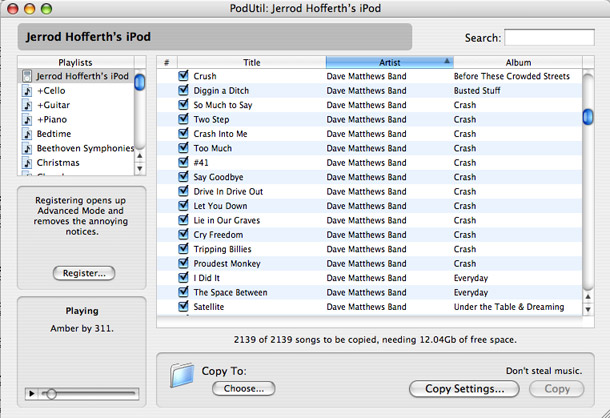
In this window, you can search for tracks (in the top right corner) or preview them straight off of the iPod by double clicking on one.
Copying Tracks to the Computer
To prepare for the music copying process, there are a few things which must be done first.
- Set your Copy Directory: At the bottom of the main PodUtil window, select a directory that you would like PodUtil to copy your iPod music to.

- Define your Copy Preferences: At the bottom right of the main window, open the "Copy Settings" button. This will open a new window where you can define several options. To have PodUtil create separate subdirectories for each Artist and Album in your collection, select these two options. You will likely want to turn on the iTunes features as well… these will take the copied songs, add them to your library, and recreate your iTunes playlists!—two very, very helpful features when restoring a lost library.
- De-select the songs (either in the main track list or in individual playlists) that you don't want to transfer to the computer.
- Click "Copy" in the bottom right of the main window to begin the process!
You’ll find the the upload occurs at a rather fast rate. You can monitor the progress of your upload either at the bottom of the main window (as a progress bar), or in the track list (in the form of icons turning to green).


When the upload is complete, you'll have a directory (or, if you selected the appropriate options, an iTunes Library) full of your iPod music. With only a few button clicks, you have now transferred your iPod's entire music library to your computer. We didn't need to search the iPod for its hidden directory or even use a file browser!
Advanced Copying Methods
If you decide to pay for a PodUtil registration key, you gain access to the features in the "Advanced" tab of the "Copy Settings" window. These features, although not necessary for most users, are incredibly powerful for music management enthusiasts.
PodUtil's advanced copying features enable you to specify a custom directory structure and filename format for the files that are copied from the iPod.
To try it out, enter into the "Copy Settings" window and choose "Advanced" from the pulldown menu. You will be presented with options for "Path" and "Filename". To the far right are pull-down menus for popular choices here, and the option to input your custom template. While this system for templates may look a bit daunting at first, it really isn't.
For example, a Filename template of '{%Album} - {%Track} - {%artist} ({%size}).{%extension}' will yield a filename such as:
Dark Side of the Moon - 4 - Pink Floyd (5.1MB).mp3
Use the built-in advanced options as a template for your ideas, and be aware that you can also use these tags as well.
(Bear in mind that these advanced File and Pathname features are superfluous if you ultimately plan on importing all the music into iTunes, and you have iTunes set to "Keep my Music Library Organized.")
Conclusions:
PodUtil, as you have likely found already, thoroughly fills a void in Apple's feature set with regards to copying music from the iPod to a computer. Not only does it offer many features, it does so in an elegant interface that allows any user to easily transfer gigabytes of music and even import it all into iTunes to finish the job.
While we feel PodUtil is top-notch software, we once again urge our more advanced readers to try several freeware and shareware options to see which package best serves your needs. Regardless of the software solution you choose, take comfort in knowing that several easy methods for recovering the music from your iPod that you once thought
Enjoy!

Featured Guides
Guides Categories
Video/Audio Guides
- 4Media Audio Converter Pro Tutorial
- 4Media Movie Editor 6 Tutorial
- Video Converter Ultimate Tutorial
- How to convert DAT to other videos
DVD/CD/Blu-Ray Guides
- 4Media Blu Ray Converter for Mac Tutorial
- How to convert Blu-ray disc to video files
- How to burn AVI, MPEG, VOB, DAT, M2V, MPG to DVD on Mac
- How to burn DivX to DVD on Mac
iPod Guides
- 4Media iPod Max Guide
- How to convert AVI, MPEG to iPod MP4 format
- Guide: 4Media iPod to PC Transfer
- How to convert DVD to iPod on Mac
iPhone Guides
- 4Media iPhone Contacts Transfer for Mac Tutorial
- 4Media iPhone Contacts Transfer Tutorial
- 4Media iPhone Ringtone Maker for Mac Tutorial
- 4Media iPhone Max Guide
iPad Guides
Youtube/Online Video Guides
- 4Media Online Video Converter for Mac Guide
- 4Media Online Video Downloader for Mac Guide
- 4Media Online Video Converter Guide
- 4Media Online Video Downloader Guide
PPT/PDF Guides
Others
Articles
- How to download YouTube videos for free
- How to download/convert YouTube videos to iPod
- How to download and convert YouTube videos
- All features of apple iPhone
- Now you can get more TV offerings from Apple iTunes
- Video Streamer HAVA from Snappy Multimedia
- iPod Growth Driving Demand for Flash Memory
- MediaMan HVX-3500 Review
- Uncertain whether new iPod will be delayed or not because of hurdles
- T3's top five iPod alternatives
- Envivio Exhibits MPEG-4 Solutions from Mobile to HD at CCBN2006