How to: Convert DVD to Archos PMP AV-700 - Mp4 Converter
Many friends have come acrossed such problems, they want to watch DVD movies on their Archos AV-700,but they can't find good way. Today I'm going to introduce a method to put DVD on Archos for satisfying your request.
Step 1
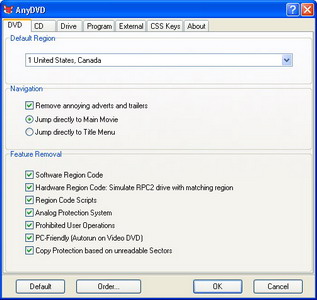
Download software AnyDVD from Antigua-based SlySoft, which is used to remove the encryption and other protections from your DVD player on your PC. This software has an invisible advantage: once you install it, programs that access the data on your DVD drive go through the AnyDVD app and never see any encoding, encryption, CSS, Macrovision, or regional encoding limitations. It's like waving a magic wand over the DVD disks you put in your computer. You can get a sense of how it lets you interface with your DVDs by looking at its settings, install and run it.
Step 2
After the installation, you still need another progamme that can read the data on the disk and convert it, compress it, and repackage it for the desired output device, in this case the Archos AV-700.
Here we choose CloneDVD Mobile, It's easy-to-use, can produce output for just about any modern portable media device.
Let me step you through how I copied one of my favorite movies, Singin' In The Rain from DVD disk to the Archos AV-700. Run CloneDVD Mobile, choose the output media format:
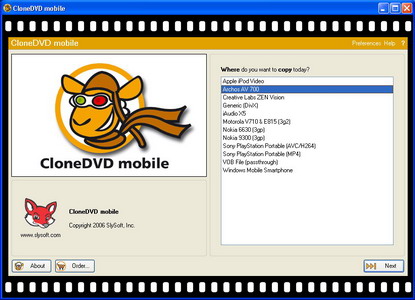
Notice that it supports producing video for Apple iPod Video devices, Sony PSPs (in two different formats!), Windows smartphones, Creative Labs Zen Vision devices, and, most importantly, the Archos AV 700 device. That's what I choose, and click Next:
Step 3
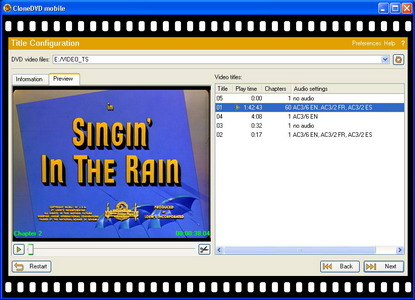
To proceed, I clicked on the tiny donut-shaped icon just below "Help", and selected the VIDEO_TS folder on the DVD itself (on my computer the DVD drive is E:, but yours might be D:, F:, G: or just about any other letter). It then shows me the various titles on the DVD: simply select the longest one and that'll be the movie. As you can see, Singin' in the Rain's running time is exactly 1:42:43.
Step 4
To make a nice icon for the file, I stepped the preview forward until it was a mnemonic frame, as you can see, rather than just a generic black screen which is how just about every movie starts. Again, I clicked Next to proceed, and:
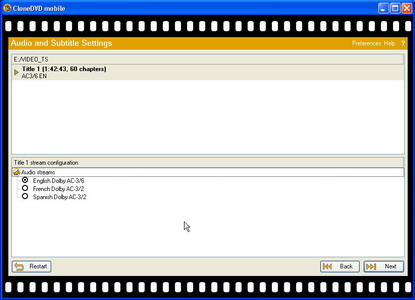
Most DVDs have more than one audio track: make sure you select the one you want at this point (and some movies, like Hero have a default track that's not English. In the case of Hero the default language is Chinese, in fact) and again click Next:
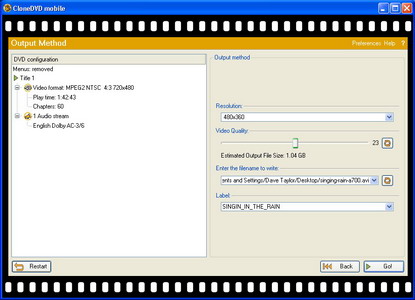
Just about ready to start up the program. The only step left is to specify the output file name: here you can see that I've specified "singing-rain-av700.avi" so I'll remember the optimized format for this particular clip. You set this by again clicking on the little donut-shaped icon just to the right of the "filename to write" box.
At this point I also recommend you change the label to something friendly and mnemonic too. "DVD DATA", for example, isn't a very device-friendly name! You might also move the video quality slider to determine where you want to balance quality against file size. Needless to say, the higher the quality, the bigger the output file: at quality level 23 this 1:43 movie is over 1GB in size.
Step 5
Everything looks good, so let's Go!
This is the screen you'll now see while the CloneDVD Mobile program is running. I've found that it takes just a bit over an hour on my Pentium WinXP box to convert a movie into the desired output format. That might be dramatically faster or slower than your own computer depending on DVD disk speed, RAM, CPU speed, and various other factors.
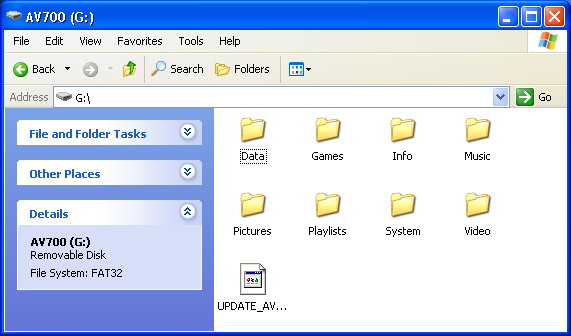
Once it's done, you can pat yourself on the back. You've done by far the hardest part of this process. Now you have a nice (albeit big) file ready to copy onto your Archos device. That can be done quite simply, by plugging the Archos into your computer using a mini-USB cable, then turning it on. Within a few seconds the Archos should show up as a removeable hard drive within Windows, and you should be able to browse its contents, finding this:
Almost there. Now you just need to drag and drop the new AVI file:

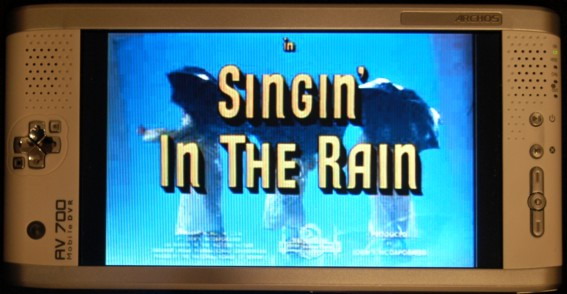
Finally, it's done, it's copied, it looks great on the Archos device:
So it's a bit of work, but with an elapsed time of less than 90 minutes per DVD, you can easily copy a half-dozen of your favorite movies onto the Archos, and enjoy it on your next flight!

Featured Guides
Guides Categories
Video/Audio Guides
- 4Media Audio Converter Pro Tutorial
- 4Media Movie Editor 6 Tutorial
- Video Converter Ultimate Tutorial
- How to convert DAT to other videos
DVD/CD/Blu-Ray Guides
- 4Media Blu Ray Converter for Mac Tutorial
- How to convert Blu-ray disc to video files
- How to burn AVI, MPEG, VOB, DAT, M2V, MPG to DVD on Mac
- How to burn DivX to DVD on Mac
iPod Guides
- 4Media iPod Max Guide
- How to convert AVI, MPEG to iPod MP4 format
- Guide: 4Media iPod to PC Transfer
- How to convert DVD to iPod on Mac
iPhone Guides
- 4Media iPhone Contacts Transfer for Mac Tutorial
- 4Media iPhone Contacts Transfer Tutorial
- 4Media iPhone Ringtone Maker for Mac Tutorial
- 4Media iPhone Max Guide
iPad Guides
Youtube/Online Video Guides
- 4Media Online Video Converter for Mac Guide
- 4Media Online Video Downloader for Mac Guide
- 4Media Online Video Converter Guide
- 4Media Online Video Downloader Guide
PPT/PDF Guides
Others
Articles
- How to download YouTube videos for free
- How to download/convert YouTube videos to iPod
- How to download and convert YouTube videos
- All features of apple iPhone
- Now you can get more TV offerings from Apple iTunes
- Video Streamer HAVA from Snappy Multimedia
- iPod Growth Driving Demand for Flash Memory
- MediaMan HVX-3500 Review
- Uncertain whether new iPod will be delayed or not because of hurdles
- T3's top five iPod alternatives
- Envivio Exhibits MPEG-4 Solutions from Mobile to HD at CCBN2006